Portal Styler for Jira Service Desk - Style it your own
Overview
“Portal Styler for Jira Service Desk” enables administrators to style the existing customer portals easily by modifying the CSS and adding arbitrary Javascript.
To configure this App in a way to modify any other CSS, you do need to have a deeper understanding in CSS.
To configure this App in a way to add Javascript, you do need to have a deeper understanding in Javascript..
Use Case Example CSS
This is just an example, you can modify the CSS in any way you like
Unlike Jira Software, where mandatory fields are marked by a red asterisk (*) and optional fields have no marking, Jira Service Desk marks only optional fields with “(optional)” and provides no marking for mandatory fields.
This can cause confusion both for Agents who also use Jira Software, and for customers, both of whom may be expecting the red asterisk to denote a mandatory field.
With “Portal Styler for Jira Service Desk” you can modify and extend the customer portals CSS upon load of the request type.
The Customer Portal standard style
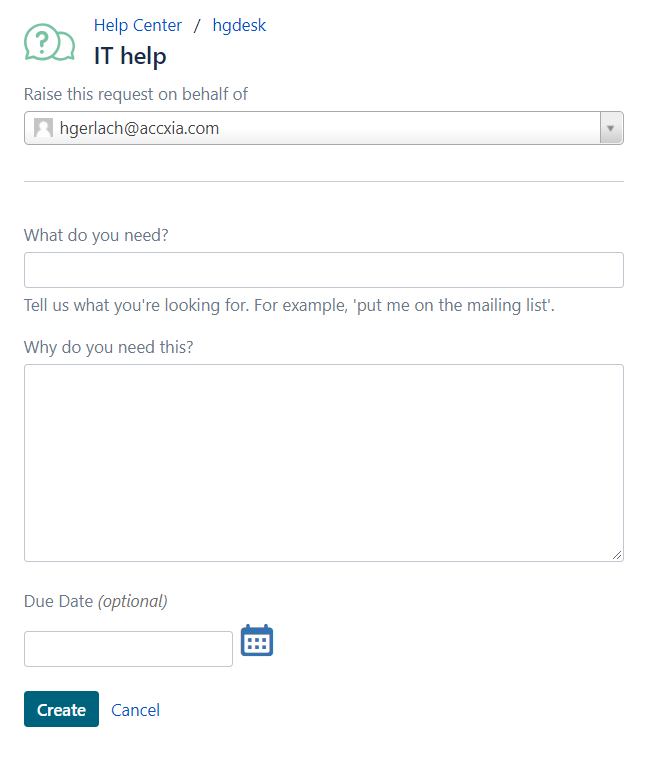
The Customer Portal changed style

Let us see how we can achieve this…
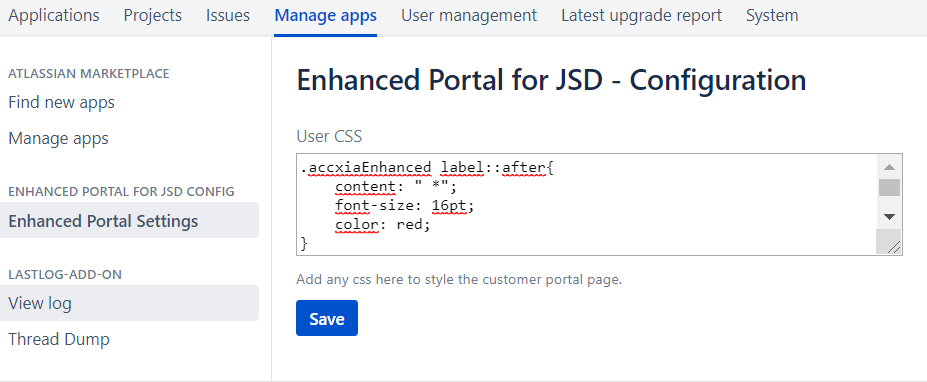
Installing the App from the Marketplace
In Jira go to Manage Apps, search for “Portal Styler” and install “Portal Styler for JSD”.
Make sure to request a evaluation license.
Configuring the App
You can edit your custom css in the Manage Apps Screen
Urgent Note
Based on Browser Caching you might need to do a full Browser Reload after applying configuration changes.
Alternate Option, disable and reenable the APP once.
Styling the Portal with CSS - Details
By default, if not configured differently, the app highlights the mandatory field with a red asterisk, as known from Jira.
The css
.accxiaEnhanced label::after{
    content: " *";
    font-size: 16pt;
    color: red;
}
.accxiaEnhanced label{
    font-size: larger;
}
.vp-optional {display:none;}Have a look at line 7. Since the app marks the mandatory fields with the class “accxiaEnhanced” we can define the added content easily via “after”.
You can also see on line 10 how we remove the text next to the “optional” fields.
You even can add dedicated text to dedicated labels.
.accxiaEnhanced label[for='summary']::after{
  content: " your Text";
  font-size: 16pt;color: red;
}Here is an example what we use at Accxia.
Please notice the “!important” flag, this is required to override predefined css.
/*initial css will be overriden if configured by user*/
.vp-request-form .field-container{
max-width:100%;
min-width:100%;
width:100%;
}

.cp-request-form .field-container{
max-width:100%;
min-width:100%;
width:100%;
}

.vp-request-form .description{
float:left !important;
padding-left:0px!important;
}

.cp-request-form .description{
float:left !important;
padding-left:0px!important;
}

.accxiaEnhanced label::after{
    content: " *";
    font-size: 16pt;
    color: red;
}
.accxiaEnhanced label{
    font-size: larger;
}
/*.accxiaEnhanced input{background-color: #a3c0ea !important;}*/
/*.accxiaEnhanced textarea{background-color: #a3c0ea !important;}*/
.vp-optional {display:none;}

.accxiaEnhanced label[for='reporter']::after{
    content: none;
}Use Case Example Javascript
This example is taken from here to show how easy to deliver this demand with Portal Styler
Service Desk Portal custom links
Hello is it possible to create a custom link in the customer portal instead of going to an issue type for creation is would go to a Confluence Confiform?

The Solution
Just add the custom javascript as shown below, fo demo purposes we simply redirecting the original Link to Google.
You can add any custom Javascript here

The Demo Code
function ourJSHandler() {
	AJS.$("a[href='/servicedesk/customer/portal/3/create/24']").attr("href",
			"http://www.google.de");
}

AJS.$(document).ready(function() {
	if (typeof JIRA != "undefined") {
		JIRA.bind(JIRA.Events.NEW_CONTENT_ADDED, function(e, $ctx) {
			ourJSHandler();
		});
	}

	ourJSHandler();
	(function(send) {
		XMLHttpRequest.prototype.send = function(data) {
			send.call(this, data);
			ourJSHandler();

		};
	})(XMLHttpRequest.prototype.send);
});