ReVitalized Issue Collector for Jira- Guide
Introduction

The Jira Issue Collector is a great tool for all customers who want to be able to raise tickets via a contact form on their web page or for those companies, which don’t have a need for Jira Service Desk.
The existing Jira Issue Collector comes with the following known limitations.
There is no spam protection, e.g. via reCAPTCHA
Issue Collector can not be branded via CSS
Email Address only shows up in the Ticket Description, but not in a custom field
Email Address and Format is not validated
Jira Customers are asking for a solution for about seven years.
Customer Requests related to Spamprotection/reCAPTCHA | Open since |
|---|---|
05/Oct/2012 | |
29/Sept/2015 | |
06/Sept/2018 | |
https://community.atlassian.com/t5/Jira-questions/Issue-Collector-Safety/qaq-p/342868 | 09/Apr/2014 |
Customer Requests related to branding/CSS | Open since |
|---|---|
13/Aug/2012 | |
08/Nov/2017 | |
https://community.atlassian.com/t5/Jira-questions/Issue-Collector-with-custom-css/qaq-p/148607 | 20/Nov/2012 |
Accxia’s Solution - ReVitalized Issue Collector for Jira
We created an App addressing all the limitations above.
Key Features
Improved security based on Google reCAPTCHA to ensure Enquiries are from real People, not Bots
Custom CSS for supporting your own Brand Guidelines
Integrated E-mail Confirmation and Validation ensures E-mail Consistency
The Contacts E-mail can be stored in a Custom Field
Supported Jira
Jira 7.5.0 - 8.14.0
App Details
The App improves on the existing Jira Issue Collector. It is injecting additional logic to address the features and limitations mentioned above.
User Guide
Raising a request is as easy as before.
For illustration purposes the form below is tailored via css and shows the original form with a different font style.
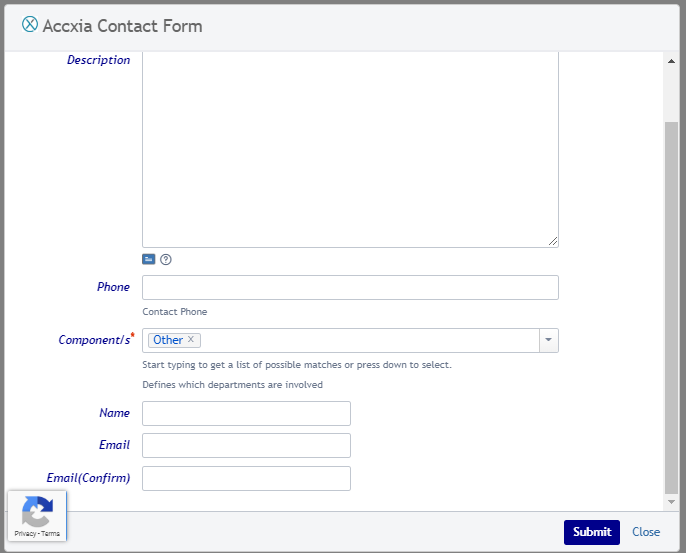
Your Jira Administrator can tailor the form easily and comprehensively according to your requirements (for details see the Admin Guide).
To ensure data quality, we’re asking the requester to confirm their email address manually.
Can you see the Google reCAPTCHA Logo?

Since the user has not been authenticated, he needs to be verified as a human. This is done by Google reCaptcha.
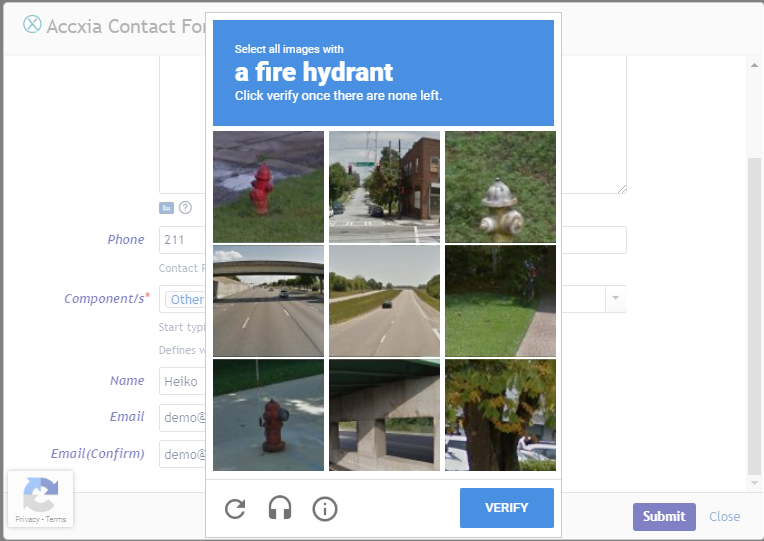
To use the Google reCAPTCHA your Jira Service Desk Instance must be able to access the Url https://www.google.com/recaptcha/api/siteverify. This is required to verify the user input.
Users Contact Request will be recorded in the configured Jira Project.
Admin Guide
Before using the App, make sure to configure your Jira Issue Collector properly. For details see
https://confluence.atlassian.com/adminjiraserver/using-the-issue-collector-938847338.html
and
This App focusses on the Jira Issue Collector. It is not changing the way how to integrate it in your website. Integrating into your website is out of scope.
1062px
Important Notice: Make sure to select

This option must be enabled !
After the plugin has been installed from the Marketplace, please ensure to request a license.
There will be a configuration link in the left navigation menu of the Jira Manage Apps Admin Screen.
Click to open the Issue Collector Administration Screen.
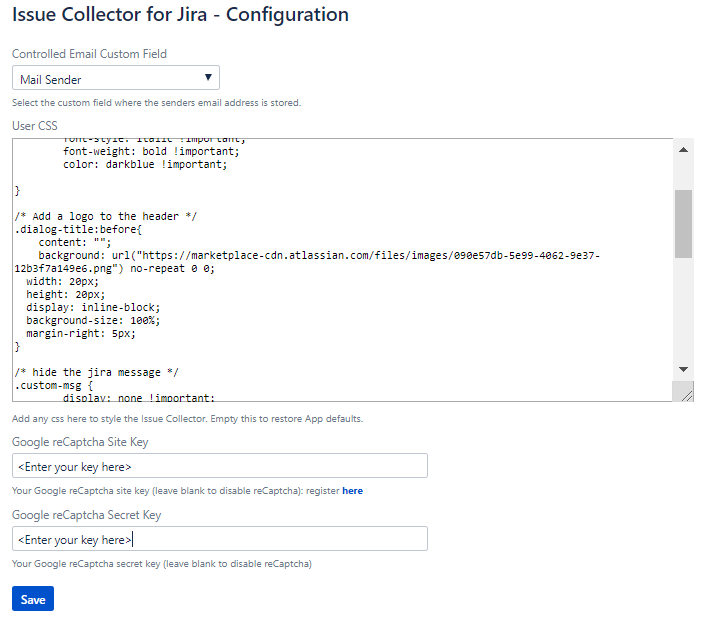
Options
Controlled Custom Field - Here you can select one of your existing text custom fields. The email address entered by the user will be stored in this custom field. (The original Issue Collector only shows the email as part of the description text) Note: This feature only works when configured with custom Option and the custom field must be visible at the create issue screen!

User CSS
This CSS allows you to style the Form the way you want. You can style the form according to your brand guidelines by using CSS. You need to be familiar with CSS to utilise this feature.Google reCaptcha public key - This is the Google reCAPTCHA public key, for details how to create a google reCAPTCHA account see https://www.google.com/recaptcha/admin#list. This link requires that you are signed in with your Google account. If you want to disable the reCAPTCHA, leave it blank.
Google reCaptcha private key - This is the Google reCAPTCHA private key. Keep it secret. If you want to disable the reCAPCHA, leave it blank.
How to style the Issue Collector Form
Here is a demo CSS
body{
	font-family: "Trebuchet MS", "Lucida Grande", "Lucida Sans Unicode", "Lucida Sans", sans-serif !important;
}

form.aui label{
	font-style: italic !important;
	font-weight: bold !important;
	color: darkblue !important;
}


.dialog-title:before{
    content: "";
    background: url("https://marketplace-cdn.atlassian.com/files/images/090e57db-5e99-4062-9e37-12b3f7a149e6.png") no-repeat 0 0;
  width: 20px;
  height: 20px;
  display: inline-block;
  background-size: 100%;
  margin-right: 5px;
}

.custom-msg {
	display: none !important;
}


#record-web-info-consent-container {
	display: none !important;
}

.aui-button-primary {
    background-color: darkblue !important;
}

/*add any text to a label */
label[for='summary']::after{
    content: none; /*add your text here */
    font-size: 16pt;
    color: red;
}

/*Keep this below to align reCaptcha badge to the left */
.grecaptcha-badge {
            width: 70px !important;
            overflow: hidden !important;
            transition: all 0.3s ease !important;
            left: 4px !important;
}

.grecaptcha-badge:hover {
            width: 256px !important;
}To ensure your css additions will not be overridden by the browser add the “!important” tag to all of your entries.
In line 1 to 3 of the example above we are setting the font style.
body{
	font-family: "Trebuchet MS", "Lucida Grande", "Lucida Sans Unicode", "Lucida Sans", sans-serif !important;
}
Line 5 - 9 styles the labels
form.aui label{
	font-style: italic !important;
	font-weight: bold !important;
	color: darkblue !important;
}
Line 12-20 Styles the form header and adds the Logo
.dialog-title:before{
    content: "";
    background: url("https://marketplace-cdn.atlassian.com/files/images/090e57db-5e99-4062-9e37-12b3f7a149e6.png") no-repeat 0 0;
  width: 20px;
  height: 20px;
  display: inline-block;
  background-size: 100%;
  margin-right: 5px;
}
Line 22-24 removes the Atlassian message
.custom-msg {
	display: none !important;
}
Line 27-29 removes the

from the form since for a contact form we think this is not appropriate.
#record-web-info-consent-container {
	display: none !important;
}
Line 31-33 sets the submit button color
.aui-button-primary {
    background-color: darkblue !important;
}
the lines below are important to place the Google reCaptcha at the left hand side. Normally this would be shown on the right. This would override the Submit button.
/*Keep this below to align reCaptcha badge to the left */
.grecaptcha-badge {
            width: 70px !important;
            overflow: hidden !important;
            transition: all 0.3s ease !important;
            left: 4px !important;
}

.grecaptcha-badge:hover {
            width: 256px !important;
}If you are familar wit CSS you can tailor the form according to your needs. This is out of scope of this documentation.
Security
Since this App is based on Jira’s native Issue Collector there is not any security impact compared to using the issue collector without our App.
FAQ
Question | Answer |
Please Raise your questions and they will appear here … | |